How To Set Up A Spot UV Business Card Design

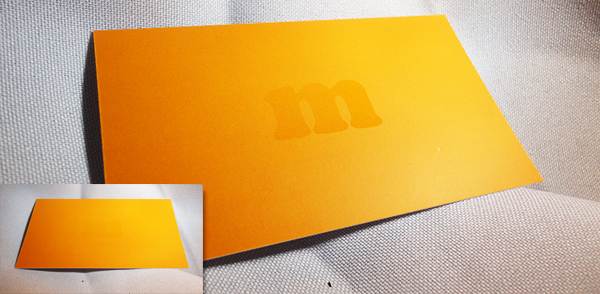
The process of setting up a Spot UV business card is different from what you are used to. Since the Spot UV coating is not actually “printed”, the area that is printed and the area that is Spot UV will require separate files.

Areas with UV (Spot) and Areas with No UV

Let’s make it clear, the purpose of spot UV coating is to cover only certain graphic areas on the card, not the whole flat side of the card. Think of it as highlighting the important parts of your business card so that they stand out. Not only that, but you can get really creative with spot UV coating and make a business card that leaves a lasting impression on the viewer.


The Printed Area

The printed area of the card doesn’t need any special layers or effects to prepare it for spot UV coating. The only thing you will do special might be to leave out certain objects that you might want to be spot UV only, without any printing under it giving it that “Ghost” effect.

Spot UV Coating Business Card - Ghost Effect


In this example, the “m” was left out of the printing, only a solid orange was printed saturating the entire back side. The spot UV coating was applied to render the “Ghost” effect to the “m” and you can only see it in the light at certain angles… this is one of the owner’s business cards, we get WOW’s every time and most customers want it for their business cards.

 Spot UV and Printed Area Demonstration - M

The Spot UV Area

Believe it or not, it’s not that difficult to make a Spot UV file for the business card. Think of it this way, the UV coating is simply a clear color that you can put over any object in your design. Therefore, all you need to do is use black (100% K) representing the areas where the UV coating will be applied. Anything that is left white in the spot UV file will NOT have UV applied to it. Anything that is black (100% K), will. Simple as that.

[note color=”#d1d7c7″]I would not recommend doing this in Photoshop since the layer would be rasterized creating a jagged edge, use Illustrator which creates a vector layer instead for nice crisp clear edges.[/note]


Spot UV Coating Layer

The logo on the front of the card is important to us so we wanted it to stand out. How did we do it? Spot UV of course! It just jumps out at you when you’re looking at the card.

 Spot UV and Printed Area Demonstration Logo

[note color=”#FFCC00″] Once you have setup your Spot UV business cards. Give us a call at 1877-mmprint to speak printing professional about your project or visit our Business Card Printing Page for more information and to request a quote. [/note] [divider top=”1″]

Printing Terms Infographic – Color Quick Guide

We strongly believe that an informed customer can make all the difference in print jobs going smoothly and without misunderstandings. I’m sure it goes for any industry.

We strive to offer a unique and pleasant experience when working with us. By providing our customers with informative collateral we not only educate our customer, but we also ease the lines of communication which instills confidence in our customer that what they are ordering is exactly what they want. It’s logical, it makes sense.

With the recent popularity and practicality found in infographics, we decided to release a series of Quick Guides of printing terms and print related infographics to offer to our customers and anyone else who can use them. Please feel free to share this!

For a more in-depth look at color, visit our Colorful Guide to Understanding Color.

Printing Terms Color Quick Guide


One Critical Component Missing from your Brochure Design

brochures by mmprintSometimes a business card just isn’t enough to leave behind when you visit a potential customer. Sometimes, customers come into your facility and want to learn more about your products or services while they wait or to take back to the office or home.

Sure, you can tell them to visit your website; there’s a lot of information and pictures there. But how sure are you that they will actually visit your site? How do you know that they will remember to do so?

Well by furnishing them with a printed brochure, you can rest assured that they have the information they seek, in their hands, ready to read. No computers to turn on, no website addresses to type, just a simple informative brochure in their hand ready to be read.

Online and Offline go hand-in-hand

Your brochure is a selling tool, it serves as a convenient hub to introduce your service or product, it can contain information about you and/or your business and a way to contact you. Now here is the way to extend the power of your brochure to actually make the sale for you: add a QR Code.
Yes, by adding a QR code to the inside or outside of your brochure, the potential customer can scan the QR code with their smart phone, go to a mobile-ready website that is formatted to make it easy for them to actually place the order for the product or schedule an appointment for the service you offer.

Read more about how to properly execute a QR Code campaign to get the best results from your efforts and save money on postage when using direct mail services.


Brochure Inspiration for Advertisers and Graphic Designers

Printed brochures come in many sizes and shapes. Of course we have to offer you a nice collection of beautifully crafted brochure samples to get your creative juices flowing and to end this post with some motivational visual inspiration.


Brochure by Brandzigners

Brochure by deviantonis

MSC Brochure by SherifShaaban

MineralKat Brochure A4 by pho3nix_bf


Brochure by ksteward

CropLife Brochure by jpz001


brochure by SeventhDesign

brochure by Amy Moen


Magical Graphic Design: Houdini

Harry Houdini with his mother and wifeHarry Houdini once said:

My brain is the key that sets my mind free.”

As designers, the key is to keep the creativity fresh and inspired. Thinking outside of the box and out of the ordinary.

Harry Houdini was a creative innovator. His public acclamation came from showing people what they had never seen before, making that which was thought impossible seem possible. Although, for him it was a daily routine. He said it best:

“My professional life has been a constant record of disillusion, and many things that seem wonderful to most men are the every-day commonplaces of my business.”

Yet his inspiration is suggestive of the inspiration that drives a graphic designer to keep designing whether for profit or not: To go beyond the norm and create or build fantasy where none is found.

Here are some fascinating designs inspired by or dedicated to Harry Houdini:


The Great Houdini

The Great Houdini by Tena Letica


Houdini Records

Houdini Records

Harry Houdini by Derkert

Harry Houdini by Derkert


Houdini by Google

Houdini by Google


The Handcuff King

Houdini - The Handcuff King


Magic by Cruenta

Magic by Cruenta


A Kind of Magic by ReptileCynrik

A Kind of Magic by ReptileCynrik


Have any Magical Design Tricks to Share? Please do so in the Comments Below

3 Key Marketing Tips for the Modern Real Estate Agent

In today’s fierce Real Estate market you have to stay on your toes. Marketing your open houses, agency, available properties and yourself as a Real Estate agent is a key component to drive business, sales and changing that For Sale sign into a Sold! sign.

As a printing company we get to see what is new and what is working across different markets using different strategies. Here are some key marketing tips inspired by what we have seen work best for real estate agencies and agents in their marketing efforts:

Content is King

1. Apply the Content is King Concept to your Real Estate Marketing Efforts

To begin with, most home buyers want to know what they are getting and how much it costs; They peruse through the property listings on your website and find a few pictures, a list of features and a few bullet points with a sales price which gives them the skinny on the property. But where is the value?

Content is King is a phrase well known to today’s internet marketers, SEO gurus and social media experts. It’s a very successful concept on the web and has been for years, these days even more so. Content adds value to a product beyond its functions or assets. Is there a positive story behind the property, the street or the town? Did someone famous or worth mentioning live there at one point? Content can give a property personality; transforming a house for sale into a home for sale. Words can influence, that’s why Content is King.


For Sale Sign with QR Code 2. Modernize your Real Estate Marketing Materials

With the sharp increase in consumer purchases of smart phones, it is a big mistake not to consider incorporating mobile into your Real Estate marketing.

As a home buyer, I can remember the frustration caused by seeing a beautiful house with a for sale sign outside as I drove by and saying to myself: “I can’t wait to get home and look up the listing on that house!”
By the time I got home I had forgotten the address, the Real Estate Agency that was selling it and of course, I didn’t stop to write down the phone number on the sign.  For the Real Estate agent this meant a lost sale or a lost lead at the least.

Behold, the QR Code. It began as a special barcode to track car parts and has evolved into the connection between offline and online marketing. The QR Code can be scanned with a smartphone to display information or initiate an action on the mobile phone.

A For Sale sign with a QR Code on it can lead a person who is interested in the home to a mobile friendly website where they can view pictures and contact the seller or Real Estate agent. QR Codes can also store contact information directly into the mobile phone’s contact list simply by scanning the code. QR codes are open for personal and commercial use. Here is a list of free QR Code readers and generators.


Personalize Communications Variable Data Printing VDP3. Personalize Communications

Real Estate agents and agencies have access to a vast amount of data about potential customers and their interests. Too often, this data goes unused to its full potential when in reality, it is bursting with value.

There is a little hidden gem that doesn’t seem to get the exposure it deserves…yet! Only the big ad agencies and corporations seem to be using this technology to their advantage. The printing industry is currently experiencing a digital evolution and from it we have the birth of Variable Data Printing, also known as VDP.

Variable Data Printing is the personalization of each individual piece in a print run. Let’s say you have a database of 5000 potential home buyers and in that database you have details about the type of homes these potential home buyers are interested in purchasing: Cape, Colonial, Ranch, two family, etc.
In your magnificent database of real estate information you also have access to all of the listings of homes for sale that have these features.

Now tie it all together. A printing company with Variable Data Printing capabilities can take your database information (usually in MS Excel format) and customize each printed piece with information pertaining to the recipient such as their name and information related to their home buying interests such as images and open house dates.

Here is a sample Postcard with Variable Data Printing


Real Estate Variable Data Printing VDP Postcard


Here are the Variable Data Fields:


Variable Data Fields in Real Estate PostcardVariable Data Printing is a remarkable technology will absolutely increase your read rate. Most generic postcards are glanced at and discarded. If the recipient sees their name on it, they have a higher probability of reading all of your content and contacting you.


Have you used QR Codes or Variable Data Printing in your Marketing? What other technologies are you using in your Real Estate Marketing Campaigns?

Please comment below

Easy Photoshop Color Splash Tutorial for Photos and Images


Color Splash Black and White Photo - Plant through Brick

Color Splash Photos with Photoshop

Photoshop Color splash is a method for emphasizing areas or objects inside of black and white photographs, with color. Very popular with wedding pictures and vintage photography, color splashing gives images an extra dimension of beauty: Color can be used creatively to change the perception of the image.


Step 1: Duplicate the Layer

Duplicate Layer in PhotoshopPhotoshop has several different ways to duplicate layers. The one in the image is probably the easiest:

Right-click on the layer and click “Duplicate Layer…”. This will make a duplicate layer above the original.

As you become more familiar with Photoshop you will find that keyboard shortcuts make certain actions faster to do than going through the menus and right clicking. With some practice it becomes a reflex such as typing; you know what keys to press without even thinking about it.

Duplicate Layer Keyboard Shortcut: CTRL + J (PC) or Command +J (Mac)

Step 2: Desaturate the New Layer

Desaturate Layer in Photoshop

Desaturation is a different process in comparison to converting an image to grayscale or a black and white yet renders the same visual effect. Desaturation occurs by pushing the CMYK values of the image towards their respective grey tone.

Photoshop automates this function for us using the Desaturate Adjustment

The two easiest ways to Desaturate a layer are as follows:

*Make sure you have the new layer selected in the Layers palette.

Click: Image>Adjustments>Desaturate.

Desaturate Layer Keyboard Shortcut:

Press Shift + CTRL + U (PC)
OR Shift + Command + U (Mac)


At this point you should see a black and white photo like this:

Desaturated Flower Girl in Photoshop

Step 3: Adding Color with the History Brush

Photoshop History Brush Tool

The History Brush Tool can be used to restore color and other attributes to an image from an earlier state in its history.

Once we desaturate the image, the original color becomes part of that image’s history. By using the History Brush Tool we can then selectively restore parts of the desaturated image to its original color version. In short, we are erasing the desaturation back to color except only where we want the color to appear.

Select the History Brush Tool by clicking on it in the tools palette.

*Make sure your new desaturated layer is selected in the layers palette.

History Brush Tool Keyboard Shortcut: Press the letter Y (Mac or PC)

Begin by setting the brush size to 200px and 0% Hardness.
This gives us a large brush size to work with and the 0% hardness creates a faded finish around the edges of the brush so that we do not end up with a hard edge:


Photoshop Brush Hardness Comparison

Now you can begin coloring in the parts that you would like to have color. Adjust your brush size accordingly to get into those tight spaces and remember that you can zoom in to make sure you add nice clean details to your image.

Brush Size Keyboard Shortcut:

  • Increase Size = [ (Mac or PC)
  • Decrease Size = ] (Mac or PC)

Take a look at the Color Splash I did in Photoshop for this tutorial, it took me less than 10 minutes:


Color Splash Using Photoshop History Brush

Experimenting with the history brush and different brush shapes for that matter can result in some unique and/or abstract photo manipulations.


Show us your skills! Tell us about your color splash project below..