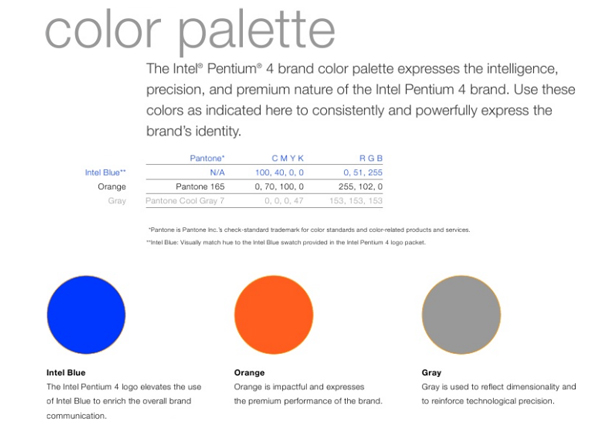
It is the season for Holiday Cards and there is nothing more thoughtful than designing your own Custom Holiday Cards with your own message and graphics. Small business and corporations can benefit from sending a personalized corporate holiday greeting card to their customers and showing their gratitude for their business.
In this tutorial we will discuss how to create a print-ready design for our custom 5 x 7 folding holiday greeting cards using Adobe Illustrator.
Adobe Illustrator is a great vector graphics program to use for print design because it creates crisp, sharp lines for both shapes and text. It also makes it extremely easy to add bleeds and crops.
Quick note:
Vector graphics is the use of geometrical primitives such as points, lines, curves, and shapes or polygon(s), which are all based on mathematical equations, to represent images in computer graphics. – Wikipedia
Step One: Creating the document for Holiday cards
Open up Illustrator, click on File>New.
The New Document dialogue pops up:

Since holiday cards are printed on flat sheets of paper, we will design using 10 x 7 as our dimensions (folded size is 5 x 7)
important:
We will also have graphics that bleed off the edge of the paper, for this we have to add 1/8th” (0.125″) bleed space all around to make sure the ink reaches the edge of our holiday cards for trimming.
– Offset and digital printing presses use the CMYK color model to produce a wide array of colors in the final print. An offset press typically has 4 ink wells which are filled with Cyan (C), Magenta (M), Yellow (Y), and Black (K) ink and a digital press would have the same except using toner instead of ink.
– Your full color design will be divided into these 4 different colors at pre-press, this is called Color Separation and is done by the pre-press department using software called a RIP (Raster Image Processor). This creates plates for an offset press or a set of instructions for a digital press.
– Images and artwork documents should always be in 300dpi as a rule for best results.
Step Two: Using the Ruler to setup Guides
Click View>Show Rulers.
As a rule of thumb, always keep any text or images that do not reach the edge at least 1/8th inch (0.125″) away from the edge to avoid it getting cut off. Most templates that you can download have these guides marked as a “Safety Lines”.
Drag your guides from the top and left ruler and place them 1/8th” (0.125″) parallel to the black artboard line on the inside.
The outcome is a blue lined box inside of the black lined artboard where we will keep all text and graphics that do not bleed. This keeps all of the text and graphics from possibly getting cut off while being cut to the 5 x 7 size.
Step Three: Begin Your Design
It is important to keep in mind the orientation of the card as it is folded.
This applies only to holiday greeting cards that fold horizontally. When designing the outside of the holiday card, you must account for the back outside panel to be upside down in your artwork.
Once all of these steps are in completed, you can rest assured that your Holiday greeting cards are print-ready.
Be sure to check out our Holiday Greeting Card Design Inspiration post to get some ideas flowing!