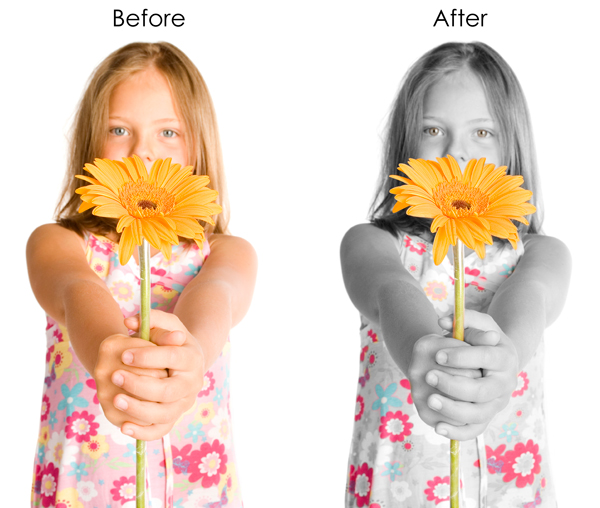
Color Splash Photos with Photoshop
Photoshop Color splash is a method for emphasizing areas or objects inside of black and white photographs, with color. Very popular with wedding pictures and vintage photography, color splashing gives images an extra dimension of beauty: Color can be used creatively to change the perception of the image.
Step 1: Duplicate the Layer
Photoshop has several different ways to duplicate layers. The one in the image is probably the easiest:
Right-click on the layer and click “Duplicate Layer…”. This will make a duplicate layer above the original.
As you become more familiar with Photoshop you will find that keyboard shortcuts make certain actions faster to do than going through the menus and right clicking. With some practice it becomes a reflex such as typing; you know what keys to press without even thinking about it.
Duplicate Layer Keyboard Shortcut: CTRL + J (PC) or Command +J (Mac)
Step 2: Desaturate the New Layer
Desaturation is a different process in comparison to converting an image to grayscale or a black and white yet renders the same visual effect. Desaturation occurs by pushing the CMYK values of the image towards their respective grey tone.
Photoshop automates this function for us using the Desaturate Adjustment
The two easiest ways to Desaturate a layer are as follows:
*Make sure you have the new layer selected in the Layers palette.
Click: Image>Adjustments>Desaturate.
Desaturate Layer Keyboard Shortcut:
Press Shift + CTRL + U (PC)
OR Shift + Command + U (Mac)
At this point you should see a black and white photo like this:
Step 3: Adding Color with the History Brush
The History Brush Tool can be used to restore color and other attributes to an image from an earlier state in its history.
Once we desaturate the image, the original color becomes part of that image’s history. By using the History Brush Tool we can then selectively restore parts of the desaturated image to its original color version. In short, we are erasing the desaturation back to color except only where we want the color to appear.
Select the History Brush Tool by clicking on it in the tools palette.
*Make sure your new desaturated layer is selected in the layers palette.
History Brush Tool Keyboard Shortcut: Press the letter Y (Mac or PC)
Begin by setting the brush size to 200px and 0% Hardness.
This gives us a large brush size to work with and the 0% hardness creates a faded finish around the edges of the brush so that we do not end up with a hard edge:
Now you can begin coloring in the parts that you would like to have color. Adjust your brush size accordingly to get into those tight spaces and remember that you can zoom in to make sure you add nice clean details to your image.
Brush Size Keyboard Shortcut:
- Increase Size = [ (Mac or PC)
- Decrease Size = ] (Mac or PC)
Take a look at the Color Splash I did in Photoshop for this tutorial, it took me less than 10 minutes:
Experimenting with the history brush and different brush shapes for that matter can result in some unique and/or abstract photo manipulations.