In this post we will explore in detail how to beef up your printed marketing materials by adding your own custom video and making it easy for your customers to share the video as well.
I am sure some of you reading this right now are imagining small screens, wires and batteries or mini-DVDs glued to the inside of your media kits. Well, that’s not the case, it’s not that complicated and it’s free!
Adding the video to your printed marketing materials is done in 3 easy steps and all 3 tools needed are available freely on the Internet.
Video Distribution
The first step, assuming you already have a video that you would like to distribute to your customers, is to upload your video to the web. There are quite a few websites that will host your video file for free, some of the most popular being Youtube and Vimeo.
If you are tech-savvy or have an IT person who handles your website, you can also upload your videos to your own website hosting server.
- Here are instructions on how to upload videos to Youtube
- Here are instructions on how to upload videos to Vimeo
By uploading your videos to the web, you make them available and easily accessible 24 hours a day, 7 days a week. Most video hosting sites as you may already know, have a commenting feature where people can leave comments about your video and you can respond to their comments.
Creating a Link
In this second step we will create a link to the video. Both Youtube and Vimeo automatically create a link for you and you simply copy and paste it. Most video hosting sites will do this for you as well.
After we have uploaded the video and generated a direct link to the video, we are going to make it a link that we can track to see how many times it has been used, shared and who shared it.
There are many free URL shorteners available that give you free tracking tools that provide basic Analytics with information regarding the use of the link you shortened. Here are a few of the most popular ones, I recommend you create a user account so that you can log in and view your results:
I tend to be partial to bit.ly because I like how easy it is to create a shortened url and the way they present the link tracking information.
To create a shortened URL, simply paste the video URL into the big blue text box and click shorten. Easy as that.
The Bit.ly analytic panel gives you different ways to look at what happened to your URL throughout its life:
- A visual chart with the amount of daily clicks
- Cool feature called Conversations which shows who is talking and sharing the same link on social networks plus a count of how many times it has been shared on various social networks.
- QR code and a sidebar to share the link on your social networks right from the bit.ly page (go to settings to authorize this).
Being able to analyze the results of your efforts is a very valuable tool. If you can tell what did well and what went wrong with your marketing, you can use this information to improve your marketing and drive better results on your next campaign.
Code Connection
The final step in adding video to your printed marketing materials is to create the connection between your video and the paper your marketing material is printed on.
Most of you may be familiar with QR codes by now since they have been around for a while. You might see them quite often on catalogs, magazines, postcards and many other direct mail printed materials; not to mention packaging and even in commercial stores like BestBuy use them to show video product demos in the stores.
If you would like to learn more about QR codes, I highly recommend you read my post that contains information about QR codes and a list of Free QR Code readers and generators.
For this specific tutorial we will be using a QR code to direct the user’s mobile smart phone to a video that you uploaded per the instructions in step one. Why use a QR code? Well, how many people do you think would want to type a URL that looks like this – bit.ly/egm7XG – into their smart phone browser? By using a QR code all the user has to do is tap his QR code reader app and scan the code.
Let’s get to it! Creating a QR code is simple. Go to one of the free websites I listed in the blog post about QR Codes. Try them all to see which one you find easier to use and feel free to share with us in the comments below.
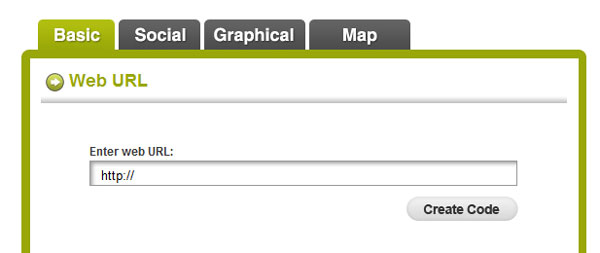
For this example I will use the www.BeQRious.com website to generate my QR code:
Simply paste the shortened URL you created in step 2 into the text box labeled “Enter web URL:” and click the Create Code button.
You will see on the right an image of a cellphone with a QR code on the screen. That is the code that was generated by your special and unique URL.
Now, if you are feeling a bit antsy, go ahead and fire up your QR Code reader app on your smart phone and scan the the code right on your computer screen. Make sure it works correctly and directs your smart phone to the video you uploaded in step 1.
If it doesn’t work, go back to step 1 and make sure you used the correct link for the video, in the URL shortener and that you used the correct link generated by the URL shortner, on BeQRious.com (or whatever qr code generator you decided to use).
Wa-la! That’s it. Download the QR code and insert into the design of your marketing materials.
I recommend you download the vector/PDF version of the code (if available) as it is created in vector format and can be enlarged or reduced to just about any size without losing any quality. I personally try to keep it no smaller than 1 inch x 1 inch.
IMPORTANT!!!


Leave a Reply