
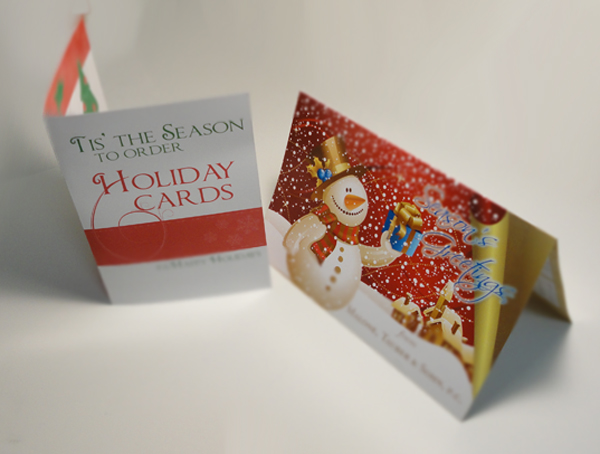
It is the season for Holiday Cards and there is nothing more thoughtful than designing your own Custom Holiday Cards with your own message and graphics. Small business and corporations can benefit from sending a personalized corporate holiday greeting card to their customers and showing their gratitude for their business.
In this tutorial we will discuss how to create a print-ready design for our custom 5 x 7 folding holiday greeting cards using Adobe Illustrator.
Adobe Illustrator is a great vector graphics program to use for print design because it creates crisp, sharp lines for both shapes and text. It also makes it extremely easy to add bleeds and crops.
Quick note:
Vector graphics is the use of geometrical primitives such as points, lines, curves, and shapes or polygon(s), which are all based on mathematical equations, to represent images in computer graphics. – Wikipedia
Step One: Creating the document for Holiday cards
Open up Illustrator, click on File>New.
The New Document dialogue pops up:
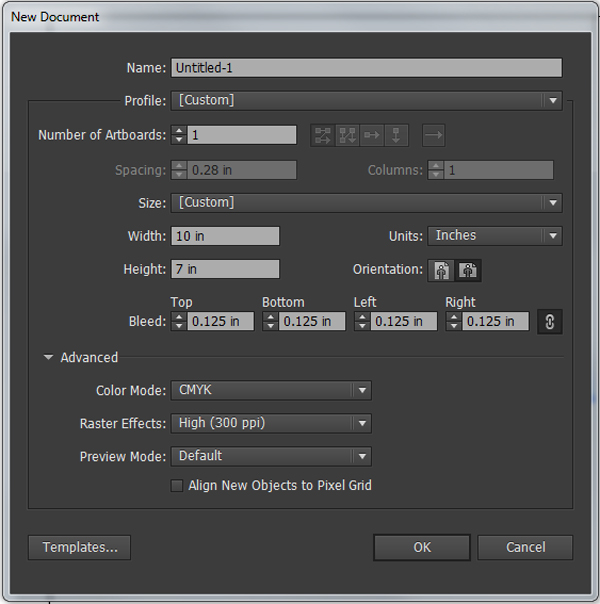
Since holiday cards are printed on flat sheets of paper, we will design using 10 x 7 as our dimensions (folded size is 5 x 7)
important:
We will also have graphics that bleed off the edge of the paper, for this we have to add 1/8th” (0.125″) bleed space all around to make sure the ink reaches the edge of our holiday cards for trimming.
 – Offset and digital printing presses use the CMYK color model to produce a wide array of colors in the final print. An offset press typically has 4 ink wells which are filled with Cyan (C), Magenta (M), Yellow (Y), and Black (K) ink and a digital press would have the same except using toner instead of ink.
– Your full color design will be divided into these 4 different colors at pre-press, this is called Color Separation and is done by the pre-press department using software called a RIP (Raster Image Processor). This creates plates for an offset press or a set of instructions for a digital press.
– Images and artwork documents should always be in 300dpi as a rule for best results.
Step Two: Using the Ruler to setup Guides
Click View>Show Rulers.
As a rule of thumb, always keep any text or images that do not reach the edge at least 1/8th inch (0.125″) away from the edge to avoid it getting cut off. Most templates that you can download have these guides marked as a “Safety Lines”.

Drag your guides from the top and left ruler and place them 1/8th” (0.125″) parallel to the black artboard line on the inside.
The outcome is a blue lined box inside of the black lined artboard where we will keep all text and graphics that do not bleed. This keeps all of the text and graphics from possibly getting cut off while being cut to the 5 x 7 size.

Step Three: Begin Your Design
It is important to keep in mind the orientation of the card as it is folded.
This applies only to holiday greeting cards that fold horizontally. When designing the outside of the holiday card, you must account for the back outside panel to be upside down in your artwork.

Once all of these steps are in completed, you can rest assured that your Holiday greeting cards are print-ready.
Be sure to check out our Holiday Greeting Card Design Inspiration post to get some ideas flowing!
12 Comments
Ines
June 30, 2019This was immensely helpful! I’m so glad because now I can rest assured that I’ve been doing it right!
Giovanni
June 30, 2019Hi Ines! You do not want to put a dashed line in your art because it will get printed! Instead, use a guide when you are designing the greeting card so only you can see it and will let you know where the fold line is. Your printer does not need you to show them where the fold line is because we think of it as a 10×7 flat piece of paper and very easily we can measure the fold is at the 5″ mark.
Also, if you ever do want a dotted line as part of your artwork, all you have to do is create a line and go to Window > Appearance, a window will open and you can click on STROKE which will give you the option to make it a DASHED line and you can control the size and space between lines etc.
Hope that helps! If you need a quote for printing your greeting cards, please request a quote here: https://www.mmprint.com/greeting-card-printing/
Ines
June 30, 2019I’ve been working with an illustrator that has given me several greeting card designs. I decided to try a few on my own but I haven’t been able to figure out how to put a dashed line down the middle for the fold. Is this line necessary for a printing company to know where the fold goes on a 10×7 layout?
Giovanni
January 20, 2017Chibi, glad to hear! Thank you for your feedback.
Chibi
January 9, 2017Making a card for a client at the moment; this tutorial was very helpful, thank you!
Giovanni
August 20, 2014Good catch Ras! Thank you!
ras
August 19, 2014One error!
In new document image Dimensions are misplaced. Width is 10″ and height is 7″.
Giovanni
May 8, 2013Good question Stella! Greeting cards are printed flat first, then scored for folding.
The inside is simple, just left and right panels. But the outside you have to visualize the folding and what side the outside front panel is actually on when the paper is flat…
When you design it, you will design it as a flat piece. For example, a 5 x 7 folded card you design as a 10 x 7 flat card.
Best way to visualize the outside is to take an actual piece of paper, fold it and mark each panel. This way, when you design it, you will know to design the cover panel on the right side and the back outside on the left side.
Hope this helps!
Stella
May 7, 2013Hi (:
Nice tut, I have a question, how do you design both the inside and outside of a card and then print it?
Yeah, I’m pretty new with the whole photoshop/illustrator thing.
Help will be appreciated.
Giovanni
April 21, 2011Thank you for your comment Miroslav!
Miroslav Svestka
April 20, 2011Thanks … a GREAT tutorial on designing cards … very to the point !
Miroslav Svestka
Tweets that mention Beginner Tutorial: Design Print-Ready Holiday Cards | Marsid M&M Group Blog -- Topsy.com
December 14, 2010[…] This post was mentioned on Twitter by The Marsid M&M Group, Cliff Krauter. Cliff Krauter said: New Blog Post: Beginner Tutorial: How to Design a Print-Ready Holiday Greeting Card using Adobe Illustrator http://bit.ly/hpbCmL […]